How to install Liteon Switch for Your XBOX 360 Liteon DVD

10 PCS, 10cm x 10cm, 2 layers prototype for $38.80 shipped!
Buy Game Console Adapters from http://www.easymg.com or http://www.diygadget.com
What is this for?
We released Solderless Liteon Kit for Liteon DVD drive almost half years ago, however we still got lots of requests to offering a solder kit, here you go, we have it! And it is also easy to install!
Key features
- 6 solder points (compare to other switch's 7 solder points)
- 3 cuts on the PCB
- Solder on traces (Other liteon switch will require you to solder on vias, which could damage your via)
- On board 22/20/18 Ohm selection switch, and also be reached after the PCB is installed in the DVD casing.
- On board Normal/RW switch, and also be reached after the PCB is installed in the DVD casing.
- One time installation, one installed, you can you just leave it there, no need to remove.
- Works for all Liteon DVDs: 74850, 83850 V1, 83850 V2, 93450. (For 74650, you don't really need to install it, you can extract the key even easier: [Xbox 360 Lite On DVD Key Dumping - TIAO's USB Key Extractor]
How to install it
Open 360 case, take out the DVD drive, and remove the PCB from the DVD case. There are plenty of tutorials on how to do this, just google it.
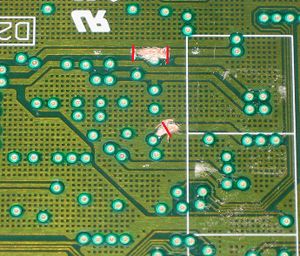
Now you have the DVD PCB out on your desk, you first need to make 3 cuts as below. You don't need to clean the paint on top of the bottom cut. However you need to remove the paint between the top 2 cuts, as you will need to solder on this point later on. Use a utility knife to cut the traces, make sure the cut is good. it is always a good idea to check if the cuts are good using a multimeter.
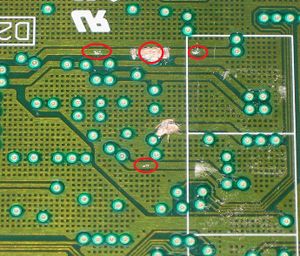
After the cut is done, mark the area of the traces you will need to solder the Liteon Switch to:
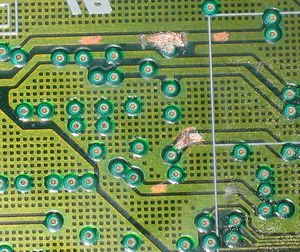
You can use a sand paper to sand the paint off, or use an utility knife to carefully scratch the paint off:
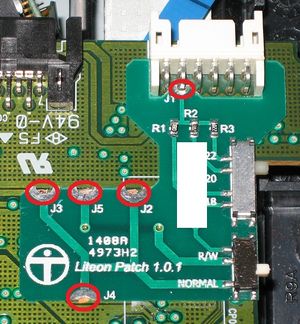
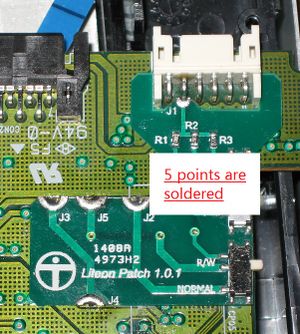
Put the TIAO liteon switch on top of the PCB, to make sure it matches the spots you just have the paint removed. You will need to solder on the 5 circled area.
Once you have the paint removed and cuts are done, double check the cut by using a multimeter, then add a little solder paste on the spot you will be soldering the switch (the spots you just have the paint removed).
Now, it's time to solder the Liteon Switch to the PCB:
Now the board is soldered on the PCB.
Use it in Jungle Flasher
The Liteon Switch has two switches, one is mode selection, the other is the resistor selection. Put the Resistor selection switch to 22 Ohm position first. Also move the mode switch to NORMAL position.
Now connect the DVD power cable to your PC and your DVD drive, connect the SATA cable to your PC and your DVD drive as well.
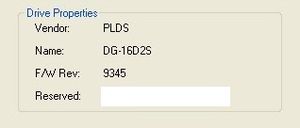
Double check all connections are good. Launch JungleFlasher, in DVD32 tab, you will see your drive is recognized:
Press the Intro/Device ID Button, and click YES on the pop up dialog, then within one second, do the following:
Turn the DVD adapter power OFF by sliding the power switch to OFF position, then move the TIAO Liteon Mode Switch to the R/W position, then turn the DVD adapter. Do these in 1 second.
You should see status 0x72 which means you are in vendor mode. As soon as you see status 0x72 and other properties then switch TIAO Liteon Switch to Normal position immediately. You can now dump your Liteon firmware and program as usual.
Buy Game Console Adapters from http://www.easymg.com or http://www.diygadget.com

10 PCS, 10cm x 10cm, 2 layers prototype for $38.80 shipped!


